I forgot to post this poem that my wife wrote which inspired me as I was working on the last painting. I think it speaks to what it means to be an artist, and why I see the work we do as valuable even when we're not what academia might consider a "fine artist." I hope some of you can read it and feel similarly inspired about your own work as artists.
Teinoscope
(Physics) An instrument formed by combining prisms so as to correct the chromatic aberration of the light while linear dimensions of objects seen through the prisms are increased or diminished; - called also prism telescope.
I have seen you standing still beneath
rapid clouds at dusk, collecting the light,
drawing the gathered radiance in like breath.
You store it everywhere—as lines, faces,
in crowded notebooks—till it spills out, bright,
new-made. Is this creation, these mixed pieces,
When patched-together, conglomerate, they
emerge like sparks from your hands, lightened
and whole?
Some men stockpile days
Like weapons, against the cataclysm.
From you, the stored scraps of collected light
leak like constant suns. And what wrought prisms
allow these sudden visions: myself, made
larger and more beautiful, all the bright
fragments ripened and mingled, naked, laid
like webs of stars together? Those saved skies
reflected back to me, mirrors on mirrors,
A tiny universe within your eyes?
Friday, September 28, 2012
Calm
Something I did as a tutorial on clouds for my Schoolism class. I've spent a bit of time on it since then.


Friday, September 21, 2012
Mariachi Dachi
I just wanted to draw your attention to an awesome comic done by my friend Kevin Merriman. He gave us an early preview of it and the story and art are both chock full of entertainment.
You can check it out here.
You can check it out here.
| Sorry, you can't click to look inside here. Follow the link above to do that. |
Monday, September 17, 2012
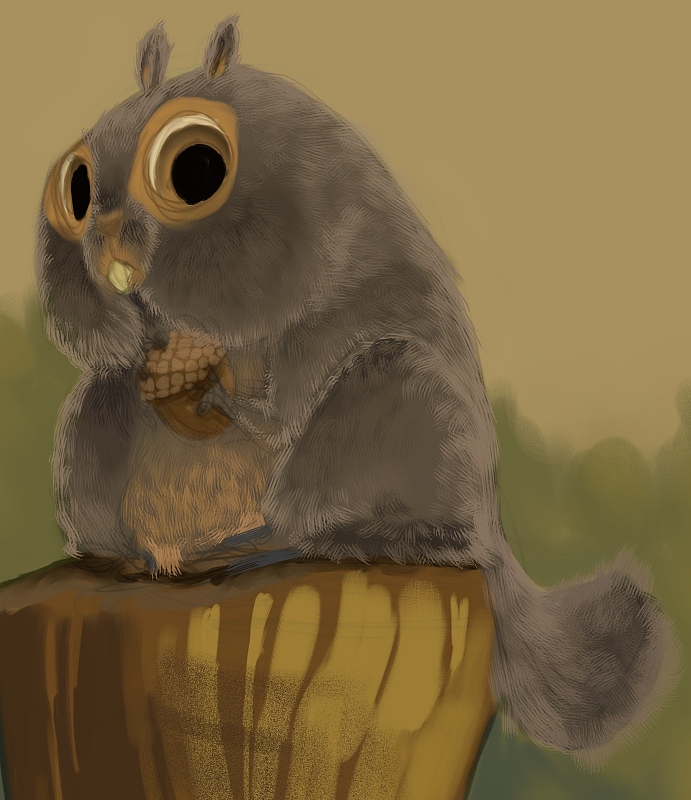
Squirrel Process
I had a couple people ask about my process recently, so here's a breakdown of how I paint (sometimes). My process is usually a lot messier than this, but these are the steps I jump around between:
 |
| I often start with a rough sketch. Adding color usually changes my feelings about the design so I like to keep things loose and change them as I go. I put the sketch on a multiply layer at low opacity before I start painting. |
 |
| I'll start most paintings with big flat colors. I usually start by filling in the background with a color that I wouldn't mind peeking out between the strokes (because that's what it's going to do). |
 |
| I usually paint in the background in that same step, but if I were more disciplined I'd paint it first behind the character. Here I used a Darken layer on top of the squirrel layer. |
 |
| At this point if I'm doing a tricky surface type like fur, I'll lay in where the major areas of texture and value will be. Here I also roughed in the acorn texture. |
 |
| Now is my first detail pass. Fingers, feet, and face get the most part of my attention. I'm careful to look for things like where the skin will show, around the eyes and in the nostrils (and in a small patch in the front of the muzzle). |
 |
| Now's my first pass for the lighting. Sometimes I'll block in lighting in the first stage, but like I said, fur is a tricky thing to paint and has to be built up in layers. I make sure that all planes facing toward the light are lit so the smaller forms don't get too broken up. |
 |
| I noticed that squirrel fur is dark at the tips, so I added a soft fringe on the forms that are turning away from us. For most of this painting I used one of two brushes---the Captured Bristle Acrylic from Painter and a modified version of that brush where I put some spacing between the bristles and turned down the "Spacing" attribute on the brush dabs so it gives a more continuous stroke. This second one I used for most of the fur. |
 |
| I wanted the eyes to look very glossy, so I put in an imaginary environment for the reflections. Sometimes reflections have colors that aren't elsewhere in the image so I took the chance to put in a little blue to make the eyes pop. I'm pretty sure the key light reflection is in the wrong spot, though most people won't notice. |
 |
| I still felt like the fur was too flat, so I put in a 50% layer of a dark black-red. |
 |
| At this point I put in the final touches: refining edges, catching textural details where important, etc. |
 |
| If I have a big area that I don't want to detail out, I'll use an overlay texture to break up the area and paint in a few details to maintain consistency. This can be hard to keep from looking cheap, but it's often worth the effort because it can save so much time. |
 |
| I have a habit of painting with less saturation and contrast than I really want, so I'll make a few adjustments before I call an image done. That's it; hope it's helpful to someone! |
Monday, September 10, 2012
High-res
I've had a few people ask for a high-res version of this image and I don't have a reason not to post it, so here it is.


Subscribe to:
Posts (Atom)

