 |
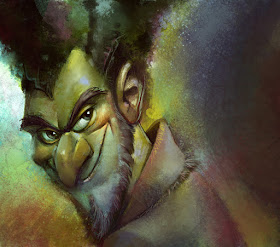
| I wondered what would happen if I used every brush in one image. I guess this is the answer. |
If you are a long-time Photoshop user, this will be a boring post for you. But if you recently made or are making the switch, then it might help. In order to make the transition to Photoshop, I had to change how I think about and use brushes. These are the categories that I find useful for everyday painting:
Drawing: brushes that work well at small scales and for details
Gradient: brushes that are good for making a smooth shift in colors with minimal "banding"
Edge: brushes that can easily create an edge
Blending: smudge tools that help smooth banding or introduce distortion to smooth areas
Texture: brushes that create strong textures
Feature: brushes used as a shortcut to create specific things (ie. trees, chains, windows, etc.)
I'll talk about each of these separately, except feature brushes, since they are so highly customized. I've included a link at the bottom with the brushes I used in this post. Copy the file into the appropriate photoshop\presets\tools folder and you can access it from your Tool Presets window/menu. I like tool presets because they contain all of a tool's information (not just stuff in the brush menu) and can be used for things like the smudge tool.
Drawing Brushes:
Photoshop does a very poor job with brush scaling. Brush dabs made at a certain size look mushy when scaled up or down very far. This is especially problematic with brushes you want to use for details, so you need brushes suited to that purpose. None of my drawing brushes are exciting, but they get the job done.
Gradient Brushes:
Photoshop's airbrush does a good job with smooth gradients, but if you want something with just a little more meat and interest, there are a variety of brushes that allow you to go from fully transparent to fully opaque with very little banding (sudden jumps in color/value). Turn down the opacity enough and lots of brushes can work fairly well for this, but sometimes it's nice to have a brush you can control to full opacity using pressure. The most important brush here is the Rounded Airbrush. It has a falloff that matches the falloff of light on a rounded surface, and it feels just like my modified 2b Pencil brush from Painter. I created the Rounded Eraser from the same dab (also in the tools below) and it works just like the Eraser brush from Painter (try it and you will see why it is awesome).
Edge Brushes:
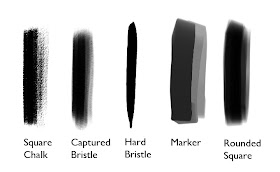 |
| Square Chalk from Blur's Goodbrush set, link above |
I like brushes that allow me to get a strong edge, and with a few exceptions, gradient brushes are bad at that. Painter had various brushes that could do both, but Photoshop's brush engine seems to resist giving me that same seamless control. My versions of the Captured bristle and the Rounded Square can be used both for gradients and for edges, if not perfectly. This Captured Bristle, by the way, is based off my favorite brush from Painter, the Captured Bristle Acrylic. It's not as good, but this brush makes me miss it less. These hard-edged brushes become surprisingly useful when paired with blenders, the next category.
Blending Brushes:
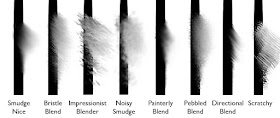 |
| Some of these have been modified from other sets, but I don't remember well enough to track them down. Sorry. |
Sometimes I just can't avoid banding, or sometimes I don't want to worry about smoothness while I lay down color. Other times I want to introduce texture or variation to the image using the colors already there. Photoshop's smudge tool is pretty good for this, but is very limited. I assume the Adobe team turned off the texture and dual brush controls for speed, but missing those controls means you have a limited number of stroke types. If you are used to the control of Painter's brushes then the smudge tool is an extra step, but you can get some nice effects with it anyway. My favorite of these is Smudge Nice, and I use it for almost everything.
Texture Brushes:
I hardly ever use these for painting, only for adding interest and variety. These brushes don't have very good edge control. This requires either accepting the loss of control, or using selections or some other method to add boundaries to your paint area. Dual Brush combinations can add some edge control, but may introduce other issues. I do like how brushes like these can quickly hide the digital feel you sometimes struggle to get away from in Photoshop.
Download my tool presets
here (installation instructions above). I'm going to do another post later with my CS6 brushes, which include some more interesting options.


That is too awesome. I've been transitioning over to PS for more art/illustration and have been struggling to create my own library of presets. Thanks! I've been enjoying your posts for a long time.
ReplyDeleteI have been a long time user of photoshop, but mainly for photo and image editing. I'm interested in moving into the more artistic side of it and this is very helpful! Thank you for posting this!
ReplyDeleteAmazing post, Thanks Sam. I've been trying to find a use for smudge, but I never really knew how to customize it like this before.
ReplyDeleteawesome share sir!
ReplyDeleteThank you very much! Excellent tool presets!
ReplyDeleteThankyou great post sums it up nicely :)
ReplyDeleteThank you so much!
ReplyDeleteSam, this may have an easy explanation, but I get confused with the dual brush and why I can't see what two brushes a dual brush is created from. Is there a way to tell?
ReplyDeleteThis is so useful, Sam! Thanks so much!
ReplyDeleteDan: I'm planning a post to go into more specifics on the smudge tool. Stay tuned!
ReplyDeleteMark: The interface of the PS brush engine is one of its strengths, but the dual brush interface is one of the weakest points within that. The current brush preset (the one your started with) forms the outside stroke, and the brush you select within the dual brush window adds texture/variation within that stroke. Play around with the blending method above for some interesting results!
Thanks everyone else!
Thanks Sam! I'm consistently amazed by your talent.
ReplyDeleteHi Sam ,
ReplyDeleteThanks a lot for to share your tools with us , I appreciate that.
About photoshop , I find it very plastic , and I feel very confortable in Painter , but I reconiza that Photoshop is more complete that Painter.
If you miss painter , I´ve found this plugin for photoshop , it´s the Painter color wheel:
http://nerdchallenge.com/lenwhite/LenWhite.com/LenWhite.com/Entries/2012/9/16_PW_CS6.html
Thank you!
ReplyDeleteExcellent post, I can compliment your idea of blending? I use the "Mixer Brush Tool" on brush tab, I uncheck "Load After each Brush Stroke".
ReplyDeleteAlso set a shortcut "N" key. Lalala I'm dancing with B, NBB, NNN, bb ...
While doing your course I forced myself to use the Painter, then tried to find a way to simulate the painter Blends. I particularly do not like the result of blend tool, I think the Mixer brush tool closer to the painter results.
ReplyDeleteCourse everyone finds the best way to reach your quality:)
Jose Ramos: I agree about the plasticity of Photoshop. One of the things I do not like about it is that you have to take extra steps to remove that feeling. I do like the color wheel better than Photoshop's horrid color picker.
ReplyDeleteFlavio: Maybe once I'm really accustomed to Photoshop I'll take a look at the mixer brushes again. I can't stand them right now. Maybe my experience with the subtlety of Painter makes Photoshop's attempt feel ham-handed---like finger-painting when you're used to a brush. Thanks for the tip on the re-load setting/keystroke!
Thanks a ton, Sam. I have spent many hours customizing PS brushes but never been very happy with them.
ReplyDeleteThank you so much !
ReplyDeleteYou are my hero, you change my life dude !
Thanks Sam for your answer.You have uploaded your brushes , could you do the same with you r spacework in photoshop?
ReplyDeleteJose: You mean my workspace? I don't really customize my workspace in photoshop. Just the color wheel and I keep the brush tab handy and my tool presets open.
ReplyDeleteThese are really great. I'm a long time Photoshop user, but I can never seem to get quite the brush look I want. Thanks so much!!!
ReplyDeleteYikes! 6.66 MB!
ReplyDeleteA supernatural talent, indeed, but apparently the DEVIL is truly in your details, sir! ;)
Can't thank you enough for sharing these awesome resources. I'm always impressed how generous the truly great artists are with their knowledge and resources.
Really hope to be able to afford your Schoolism class someday (as long as it doesn't cost $666).
All the best and God bless, Mr. Nielson!
Thank you so much! Thanks god I kept reading! :) I didn't know about the tools and I feel now as a kid with new shoes haha
ReplyDeleteYou rock Sir
thank you sam, that's defenitly the best brush pack I have found in years. I have a question thoughm and pardon my ignorance. Is there a way to use these presets with the eraser tool ? They just disapear when I choose the erase....
ReplyDeleteThis comment has been removed by the author.
ReplyDeleteThis comment has been removed by the author.
ReplyDeleteBret: I prefer to do the alternate calculation for MB. :)
ReplyDeleteYaniv: After you select a tool preset, you can go into your brush menu (the one you access from the corner in the brushes tab) and create a new brush preset. This brush preset can be used with the eraser.
I prefer to use tool presets because they include more information, but they do lose the flexibility of brush presets that way. I hope that helps!
Thank you very much dear Sir for sharing us your brush stuff and experiences!
ReplyDeleteYou're welcome!
DeleteThank you so much for sharing this! This is a gamechanger! Thanks again for your generous share.
ReplyDelete6.66Mb - *Gasp* lol.
ReplyDeleteCheers, mate.
Very kind of you.
Go by the, uh, _other_ measurement of MB in this case. If it makes you more comfortable. :)
DeleteThanks for sharing this. Your brushes are amazing :)
ReplyDeleteYou're quite welcome!
DeleteHey Sam just curious if you ever ended up posting these brushes for cs6? cheers
ReplyDeleteI have a CS6 set, but I haven't polished them enough to feel comfortable posting them yet. Maybe soon!
DeleteSo I downloaded the file: Sam's Tool Presets.tpl Not sure what to do with them/how to access the brushes. Shouldnt the extension be .abr or a folder...I dunno, no matter where I put that .tpl file I can't seem to get it right. Can somebody help me? Apparently I'm a moron :D
ReplyDeleteIt's a toolset, which means it goes in the presets folder just like the brushes, but not in the brushes subfolder (tools instead). I've tell you exact location but it's different depending on whether you're using a mac or PC (and depending on which version of windows).
Deletehttp://www.photoshopdaily.co.uk/tutorials/install-tool-presets/ shows where to put it for a mac.
DeleteOh, and it won't show up in your brushes window. You need to open up your tool presets window to access these brushes.
DeleteThanks for sharing useful brush! :)
ReplyDeleteThis comment has been removed by the author.
ReplyDeleteThank you for the photoshop tips! It's a lifetime of learning photoshop. I like your character art at the top, glad you are able to enjoy your career! I'll be experimenting with the different brushes. Sometimes I'm not sure what to do with one or the other, or they don't do what I want. I suppose I can just create my own too. Sometimes I end up with something unique, but that has to go into my portfolio. The client won't approve! ~Digital abstract in california
ReplyDeleteThanks for your brushes!
ReplyDeleteDid you post somewhere your CS6 brushes? Please :)
Thanks a million for the brushes. Love them.
ReplyDeleteVeeeeery nice. Thanks a lot!
ReplyDeleteHi Sam, Thank you so much for the brushes, I took your lighting workshop a while ago really enjoyed it ! Hope you are great by Walder johan www.walderworld.com
ReplyDeleteYou're welcome Walder, and thanks!
Deleteis there a difference between how the brushes work on a Mac versus a PC? i work on a Mac at school and a PC at home and in the Blur's Goodbrush set there is this wonderful grass brush. It uses both foreground and background colors and various shades in between and changes the angle of the grass as you sweep. But I can never seem to find that brush when I'm working at home.
ReplyDeleteI don't think there's a difference between behavior on Mac vs. PC, but there will be a big difference between the way dual brushes work in CS4 and CS6. I don't know about CS5, but I know for sure the behavior changed between 4 and 6.
DeleteThank you for the brushes. ;)
ReplyDeletenice trick with brushes
ReplyDeletebrushe is important tool
ReplyDeleteHi Sam,
ReplyDeleteThanks for the article on brushes. I'm primarily a photographer but have been doing more and more painting. I use CC 2014 (haven't bothered to upgrade to 2015 yet) and I have Painter 2016 but so far haven't really developed a taste for it and it feels klunky and buggy compared to photoshop. I basically take a photograph and using the mixer brushes, smear and paint until it looks a little more painterly. Being a photographer, it's sort of hard to transition to a loose enough style to really look painterly but it's a work in progress.
Just curious if you're still using photoshop and why you switched away from painter?
One issue I have is that I do large prints (36x48 for example) so I usually edit at 4000x6000 at which neither painter nor photoshop handle very well. The mixer brush performance is poor at that resolution, particularly if you sample all layers. I've had to learn to work on a composite layer for the most part. Additionally, the bristles are too thick in both programs at larger sizes . I've been primarily using various captured bristle brush tips but I think I'm going to go for a more pastel-like look in the future because of the unnatural look of the bristles at the large sizes.
Just wondering your thoughts. I'll post this on your blog too if you'd prefer to answer for the benefit of others...
This comment has been removed by the author.
ReplyDeleteAdobe Photoshop Tutorial
ReplyDeleteBrushes
Finding Brush Controls
Brush Blending Modes
File Browser
Basic Navigation
Finding Your Keys
Using Your Keys
Batch Renaming Your Files
Creating a Custom Layout
Exporting Your File Browser Changes
jual mesin jahit portable 4 in 1 berbagai macam harga
ReplyDeletethank you
ReplyDeletemerci
ReplyDeletemerci
ReplyDeleteVery cool brush those are. very good. thanks for sharing.
ReplyDeleteClipping Creations India | ecommerce image editing service
very nice tutorial , thank you very much
ReplyDeletebisnis online shop paling laris
peralatan menjahit
usaha rumahan
harga mesin jahit juki
ac mini portable
panduan belajar menjahit
Nice post and wonderful photoshop brushes collection with details describe step by step . thanks for sharing with us
ReplyDeleteRemove white Background | Image Masking Service | clipping Path
Thank you for sharing such a useful information.
ReplyDeleteYour blog has given me that thing which I never expect to get from all over the websites. Nice post guys!
ReplyDeleteThe wonderful bashes are described their jobs perfectly. This is helpful for the Photoshop experts like us. Thanks for the tutorial.
ReplyDeleteclipping path service
clipping path service
This comment has been removed by the author.
ReplyDeleteThis comment has been removed by the author.
ReplyDeleteso you just keep posting as free advertisement?
DeleteReally helpful for me thanks for sharing
ReplyDeleteClipping Path Service