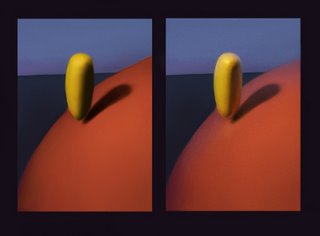
First of all, I like to think of each surface in my paintings as a light source that will bounce its light onto surrounding objects. The amount of light being reflected decreases with distance from the object "producing" the light.
Also, when painting these reflected lights I like to use layers with the "Lighten" method. This does a pretty good job of preserving the highlights from the main light source, while approximating the additive effect that light has on surfaces. It doesn't always work perfectly, but usually can save a lot of painting time.
I made this example, before using the light layers and after:

I used a primary color scheme to show how much you can exaggerate light effects without (hopefully) being too offensive to the eyes. In reality, unless these were very shiny surfaces you wouldn't get reflected colors as saturated as this because the local color of bright red and yellow objects would be absorbing anything that wasn't red or yellow, respectively.


Great tip. I think this tip of the week thing is going to be good. Looking forward to more.
ReplyDeleteHey Sam, As I was driving to Oregon last Saturday I looked for the reflection phenominon that you were talking about last week. I observed it on everything, street signs, other vehicles, my leather wallet, then I got here and did experiments and it even works on things that aren't even shiny. I have no idea why, but it appears to be a consistent principle of nature. Objects do appear more reflective as the angle of the surface becomes more parallel to the line of sight.
ReplyDeleteVery interesting Dave. I wonder how one could go about researching something like that.
ReplyDeleteYou lost me at "Tip of the Week." Just kidding, Sam. Thanks for the tip. Very interesting.
ReplyDeleteThanks for the tip, Sam. Keep 'em comin'!
ReplyDeleteLet me know when you start teachin cause I would take your class in a heart beat.
ReplyDeleteThanks for sharin. You rock sam
please, keep posting those kind of tips, these are really helpful!
ReplyDeleteWOW! your character designs are fantastic, and your painting technique is astounding! love your work, inspired :D
ReplyDeleteAwesome! Keep them coming! BTW part of that reflection working on things that are matte even more on an angle - not straight on but glancing. Look up Fresnel effect. It's the same reason you can look straight down at a lake and see to the bottom but walking up to it you only see the sky. At the right angle even a piece of paper can be pretty reflective.
ReplyDeleteThanks for the info, Mark! Did a quick search on it and found a few links. Here's one on how it works in shaders:
ReplyDeletehttp://mediawiki.blender.org/index.php/Manual/PartIII/Mirror_Transp
craziness!!!!
ReplyDeletethanks for the tip,, so question: this principle of reflection, do you use it on most everything you color??(obviously it depends on the colors used and how close the objects are)???
thanks agin, this is going to help a ton!!!
Wooha!
ReplyDeleteAwesome works here. I saved a few for some inspiration, I hope you don't mind.
Cheers,
Milenko
This 'Tip of the Week' thing is turning out great so far Sam. Thanks for taking the time and energy to do this for all us lackeys. Even if we know the principles it's always good to review.
ReplyDeleteTyler: Yeah, usually. Unless I'm trying to give the image some specific kind of stylistic effect.
ReplyDeleteKen: Yeah, I need reminders all the time of things I've already learned. It's sort of embarrassing.
thanks for the lesson, Sam! I'll take your tip to the drawing board this week.
ReplyDeletejed
Thanks Sammy, good tip!
ReplyDeleteRight Ryan, like you need it. I'm one of the least qualified people here to do this kind of thing---it should be someone like you or Dave or Todd instead. Oh well, at least it will save me some time here and there.
ReplyDeleteBut thanks anyway!
this is a very good example!!!
ReplyDeleteI like a LOT how you use the color..atmosphere and volume...
and your mignola imatation is PERFECT!!!
XD
I come to se news;)
and reaaly thanks for your comment on my work:)
freaking awesome man!!! i just discovered your blog and now intend to check it out every week! incredible work. i especialy love the pencil drawings earlier on.
ReplyDeletethanks for doing this blog, sir! i could spend a week in here looking at your work.
ReplyDelete