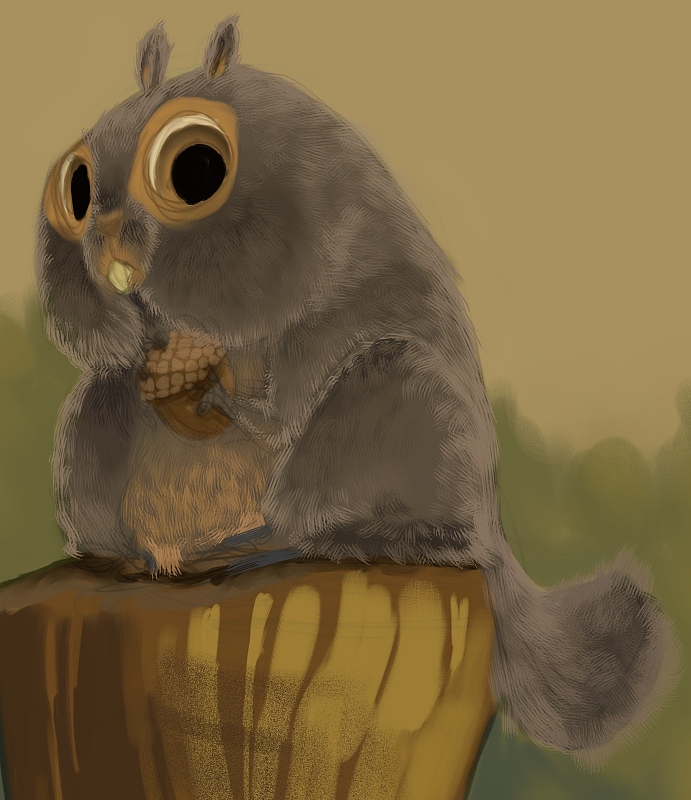
I had a couple people ask about my process recently, so here's a breakdown of how I paint (sometimes). My process is usually a lot messier than this, but these are the steps I jump around between:
 |
| I often start with a rough sketch. Adding color usually changes my feelings about the design so I like to keep things loose and change them as I go. I put the sketch on a multiply layer at low opacity before I start painting. |
 |
| I'll start most paintings with big flat colors. I usually start by filling in the background with a color that I wouldn't mind peeking out between the strokes (because that's what it's going to do). |
 |
| I usually paint in the background in that same step, but if I were more disciplined I'd paint it first behind the character. Here I used a Darken layer on top of the squirrel layer. |
 |
| At this point if I'm doing a tricky surface type like fur, I'll lay in where the major areas of texture and value will be. Here I also roughed in the acorn texture. |
 |
| Now is my first detail pass. Fingers, feet, and face get the most part of my attention. I'm careful to look for things like where the skin will show, around the eyes and in the nostrils (and in a small patch in the front of the muzzle). |
 |
| Now's my first pass for the lighting. Sometimes I'll block in lighting in the first stage, but like I said, fur is a tricky thing to paint and has to be built up in layers. I make sure that all planes facing toward the light are lit so the smaller forms don't get too broken up. |
 |
| I noticed that squirrel fur is dark at the tips, so I added a soft fringe on the forms that are turning away from us. For most of this painting I used one of two brushes---the Captured Bristle Acrylic from Painter and a modified version of that brush where I put some spacing between the bristles and turned down the "Spacing" attribute on the brush dabs so it gives a more continuous stroke. This second one I used for most of the fur. |
 |
| I wanted the eyes to look very glossy, so I put in an imaginary environment for the reflections. Sometimes reflections have colors that aren't elsewhere in the image so I took the chance to put in a little blue to make the eyes pop. I'm pretty sure the key light reflection is in the wrong spot, though most people won't notice. |
 |
| I still felt like the fur was too flat, so I put in a 50% layer of a dark black-red. |
 |
| At this point I put in the final touches: refining edges, catching textural details where important, etc. |
 |
| If I have a big area that I don't want to detail out, I'll use an overlay texture to break up the area and paint in a few details to maintain consistency. This can be hard to keep from looking cheap, but it's often worth the effort because it can save so much time. |
 |
| I have a habit of painting with less saturation and contrast than I really want, so I'll make a few adjustments before I call an image done. That's it; hope it's helpful to someone! |


So lovely! It's great to see your process!
ReplyDeleteThanks Sam! This was very helpful
ReplyDeleteCool Sam! One question, is it common to distort the position of the eye highlight compared to the keylight like you did here? just for psychological effect?
ReplyDeleteGreat insight on your process Sam! How long did it take you to finish it?
ReplyDeleteJohan: Photographers and movie lighters are often placing extra lights just to get highlights from the eyes, so while it may not be real-world natural, we're used to seeing it so it's easy to get away with.
ReplyDeleteToueT: I think 10 hours? Not sure.
You make it look so deceptively easy. ^^;
ReplyDelete"hope it's helpful to someone!"
ReplyDeleteBEYOND helpful!
very helpful! thanks!
ReplyDeleteGenius post!! Thihs squirrel is screaming "Please sell me together with your plushies!!" THanks so much for the share ^-^
ReplyDeleteThanks for sharing, and the squirrel is just so darn cute. Love it!
ReplyDeleteSam, thank you so much for this tutorial! It helped me very much!
ReplyDeleteThanks again! :)
Thanks a lot for sharing your process, Sam !
ReplyDeleteVery useful!
ReplyDeleteThanks for the post!
This is great!
ReplyDeleteI was just wondering what kind of brushes do you use?
Merel: I used a modified version of the Captured Bristle Acrylic in Painter. Turn down the spacing and spread the bristles out and you'll have something similar.
ReplyDeleteHmmm. Yeah. I love the step by step process. I never take this time with anything, but then, I work with photos, and am traveling at light speed all the time. So I don't stop to think what I could be doing. I am intrigued that you put the sketch into a multiply layer, but then turn down the opacity. I don't understand why you do that - seems like two steps forward, one back. Curious.
ReplyDeleteI got cross-eyed being so close to the texture, and then tired and the care you take with the edges and the fringes and each hair tip. I can guess at the hunger you have in the tips of your fingers just to DO this stuff, but I don't have that hunger. I just don't have it, much to my sorrow.
And even if I did, I don't have the sense of it. The magic isn't in me. I look at the fur. Then I look at the eyes. And I have no sense of how to get from one to the other. The eyes are total glass. How do you make total glass out of pigment - well, color? I don't understand at all, and never have. Painters in oil can make me reach to wipe away drops of water they have made out of paste and color. To me, this is like a Godly mystery.
K: The multiply layer allows me to reference the sketch the whole time while I am painting, then I can eliminate the sketch at the end. You get all the benefits of the guidelines being there without the disadvantages in the final composition.
ReplyDeleteGlass, fur, and drops of water are all just beams of light glancing off of or passing through clouds of atoms in different ways. Being able to paint those things doesn't come through intuition, but knowledge of how those surfaces work and how to apply that knowledge with the tools you have. Magic is just a description we use for technology or knowledge that we don't yet know how to control.
Control is not a concept in my world. There are only degrees of chaos and luck.
ReplyDeleteGlass is also texture. At least, with paint it is.
And hold yer horses, mister - magic is what we heathen nations consider ANYTHING someone like you does. So there.
And this too - but I meant, why do you set it to multiply and then mess with the opacity - but even as I write that, I see exactly why. I knew the bit about being able to take advantage of the guide lines. It was the opacity thing, but of course, you set blend to magnify so that you've got that strength coming through, then tone it down in degrees with the opacity so you don't have to have the thing screaming in your face all the time.
ReplyDeleteSo. Yeah.
Awesome! Love this. The fur texture is really neat. :)
ReplyDeleteThis comment has been removed by the author.
ReplyDeleteThanks for showing us the know-how.
ReplyDeleteDo you prefer Painter or PS?
Greetings from Ecuador!
Edu: I'm leaning most heavily on Photoshop these days.
ReplyDeleteIncredible work, thank you for sharing so much information! It's refreshing to see the most talented artists share their techniques so others can benefit.
ReplyDeleteHi Sam, I spotted your avitar, the dog in the armchair and instantly fell in love. I have a small production company called Red Dog Productions and I would really like to use the pic in some of our promotional material. Can I do that if I give you full credit and include this blog address?
ReplyDeleteLet me know, my name is Nikki
reddog@aapt.net.au